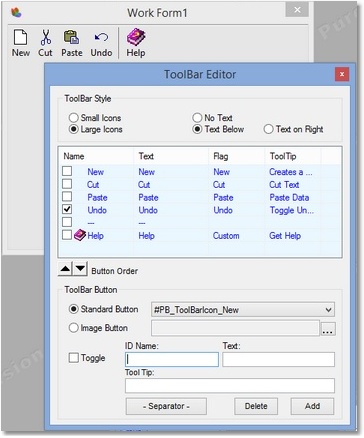
Button Order
The order of the ToolBar Buttons can be changed by selecting the Button and using either the Up and Down arrow buttons in the ToolBar Editor Interface or using the PGUP and PGDN keys on the keyboard.
Delete Button
To Delete a ToolBar Button, select the Button you wish to delete and either press the Delete Button in the ToolBar Editor Interface or press the DEL key on the keyboard.
Add Button
To Add a ToolBar Button, select the type of button you wish to add. This can be a Standard Button (pre-made) or an Image Button (custom image). If you wish to have the button toggle, check the Toggle option. After entering an ID Name and any other additional information, press the Add button to add the ToolBar Button to the list.
If you select an item in the ToolBar list, your new ToolBar Button will be added at that location and all items after your selected location will be moved down in the list.
Edit Button
Editing an existing ToolBar Button can be performed by double-left clicking the appropriate Button in the List.
The Button will be removed from the List and the Button data will be moved down into the ToolBar Editor. You then have the option of making changes and putting the Button back into the List by pressing the Add Button or you can put the Button back into the List at a different location by selecting a location in the List and then pressing the Add Button.
(The Button will be added at the selected location and all other Buttons will be moved down the list from the selected location)
When you have finished adding your ToolBar Buttons, you can view them in your Form by closing the ToolBar Editor and activating the ToolBar from the PureVision main interface.
NOTE: Starting PureBasic v6.00 ToolBarStandardButton has been removed but PureVision's PVGadgets Module provides it's own custom images allowing you to continue using it.